Learning how to wire an outlet might sound like a job only for a pro, but I promise you, it’s something you can totally handle. Are you adding a new plug to your workshop? Or maybe replacing an old, painted-over receptacle that’s seen better days? Whatever the reason, you’ve come to the right place.
This guide is designed for absolute beginners. We’ll skip the confusing jargon and walk through each step together, with plenty of pictures and tips to make sure you do it safely and correctly the first time.
“The key to any electrical work isn’t being a genius—it’s being safe and methodical. Follow the steps, double-check your work, and you’ll feel an incredible sense of accomplishment when you plug something in, and it just works.”
Why I Wrote This Guide
I remember my first time looking at a mess of wires inside a wall. It was intimidating! I was just a new homeowner trying to save a few bucks by installing an outlet in my garage. I spent hours watching confusing videos and reading technical manuals that felt like they were written in another language. After a lot of trial and error (and a few flipped breakers!), I finally figured it out. I wrote this guide to be the simple, friendly resource I wish I had back then. This isn’t just a technical manual; it’s a helping hand to give you the confidence to tackle your own home projects.
This article is for informational and educational purposes only. Working with electricity can be dangerous and may lead to injury or even death. Always turn off the power at the circuit breaker before beginning any work. If you are unsure or uncomfortable with any step, please contact a qualified electrician. Follow all local electrical codes and safety guidelines. For more comprehensive safety information, please visit the Electrical Safety Foundation International (ESFI).
Tools and Materials You’ll Need
Before you start, let’s get our gear together. Having everything ready makes the job go much smoother.
Tools:
- Voltage Tester (a non-contact one is easiest!)
- Wire Strippers/Cutters
- Needle-Nose Pliers
- Phillips and Flathead Screwdrivers
- Utility Knife
Materials:
- A new electrical outlet (also called a receptacle)
- A new outlet cover plate
- Electrical tape (optional, but good to have)
How to Wire an Outlet: 7 Simple Steps
Alright, let’s get to it! We’ll take this one step at a time. No rushing!
Step 1: Turn Off the Power (The Most Important Step!)

This is not optional. Go to your home’s main electrical panel (or circuit breaker box). It’s usually in the basement, a garage, or a utility closet. Find the breaker that controls the room you’re working in and flip it to the “OFF” position.
Pro Tip: If your breakers aren’t labeled, plug a lamp or radio into the outlet you’re working on, turn it on, and then flip breakers one by one until the lamp turns off.
Step 2: Double-Check for Power

Safety first, always! Take your voltage tester and hold its tip near the slots of the outlet you’re about to work on. The tester should not light up or make any noise. This confirms the power is completely off. If you’re installing a new outlet, test the wires coming into the electrical box.
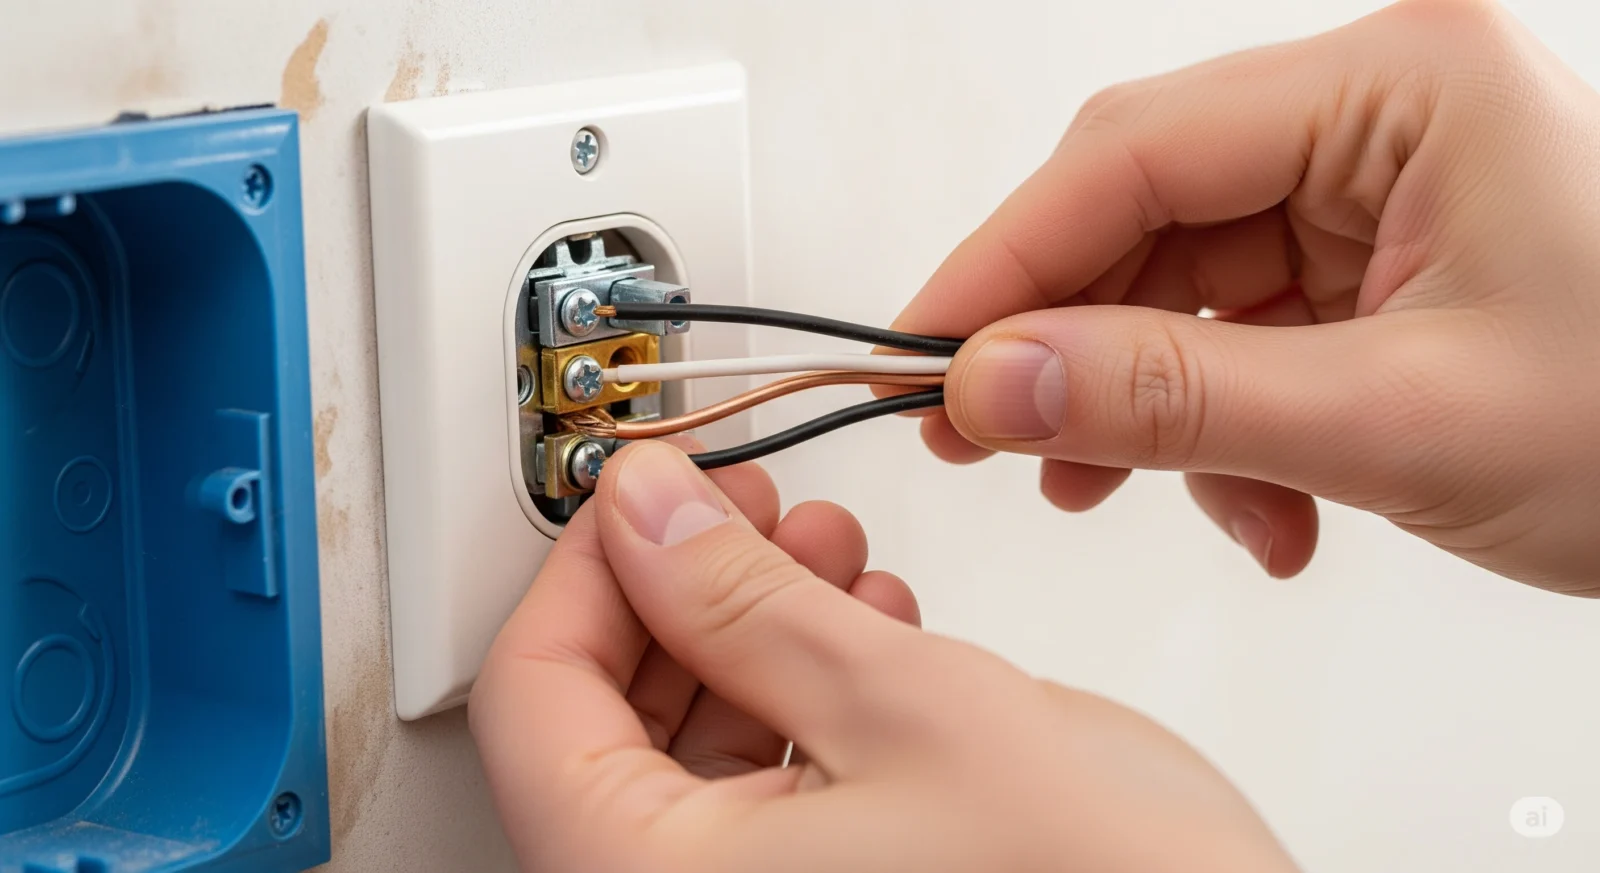
Step 3: Prepare the Wires

If you’re replacing an old outlet, unscrew it from the wall and gently pull it out. If you’re installing a new one, you’ll have wires waiting for you in the electrical box.
You should see three types of wires:
- Black Wire: This is the “hot” wire. It carries the electricity.
- White Wire: This is the “neutral” wire. It completes the circuit.
- Bare Copper or Green Wire: This is the “ground” wire. It’s a safety feature.
Use your wire strippers to remove about 3/4 of an inch of the plastic insulation from the end of the black and white wires. The ground wire is usually already bare.
Step 4: Create a “J” Hook

This little trick makes connecting the wires so much easier and more secure. Take your needle-nose pliers and bend the exposed end of each of the three wires into a small hook, like the letter “J”.
Step 5: Connect the Wires to the New Outlet

ow it’s time to connect everything. Look at the side of your new outlet. You’ll see different colored screws. This is the secret code!
- The Black (Hot) Wire connects to the Brass (Gold-colored) Screw.
- The White (Neutral) Wire connects to the Silver-colored Screw.
- The Copper/Green (Ground) Wire connects to the Green Screw.
Loop your “J” hooks around the correct screws in a clockwise direction. This way, when you tighten the screw, it pulls the wire in tighter. Use your screwdriver to tighten each screw until it’s snug. Don’t overtighten, as this can damage the wire.
Step 6: Secure the Outlet in the Box

Gently fold and push the wires back into the electrical box. Don’t just jam them in! Then, line up the mounting screws on the top and bottom of the outlet with the holes in the electrical box. Screw it into place until it’s flush and straight.
Step 7: Finish Up and Turn the Power On

Attach the new outlet cover plate with the small screw it came with. Now, head back to your breaker box and flip the breaker back to the “ON” position.
Go test your work! Plug in a lamp or your phone charger to make sure it works. Congratulations, you just learned how to wire an outlet!
7 Pro Tips for a Perfect Installation
- Take a Picture: If you’re replacing an old outlet, snap a quick photo with your phone before you disconnect any wires. It’s a great reference if you get confused.
- Righty-Tighty: Always wrap your wire hooks around the terminal screws in a clockwise direction.
- Check for Back-Wiring Holes: Some outlets have push-in holes on the back. While they seem easier, professional electricians recommend using the side screws for a more secure, long-lasting connection.
- Wrap with Electrical Tape: For extra safety, you can wrap a layer of electrical tape around the outlet, covering the terminal screws. This helps prevent any accidental contact with the electrical box.
- Don’t Cut Wires Too Short: Leave at least 6 inches of wire coming out of the box. This gives you plenty of room to work.
- Use the Right Outlet: Most household circuits are 15-amp. Some kitchens or garages use 20-amp circuits. Match your outlet’s amperage (it’s written on the front) to the circuit breaker’s amperage.
- Tug Test: After tightening each screw, give the wire a gentle tug to make sure it’s secure and won’t pop off.
Common Mistakes to Avoid When Wiring an Outlet
- Forgetting to Turn Off the Power: The #1 mistake. Never, ever work on live wires.
- Mixing Up Hot and Neutral Wires: Reversing the black and white wires can still make the outlet seem to work, but it creates a serious safety hazard. Remember: Black to Brass, White to Silver.
- Leaving the Ground Wire Disconnected: The ground wire is your failsafe. It protects you from electric shock if something goes wrong. Always connect it.
- Over-tightening Screws: Cranking down too hard can break the screw terminal or damage the wire, leading to a poor connection. Snug is good enough.
Wiring a Different Type of Outlet: The GFCI
You’ve probably seen those outlets in bathrooms and kitchens with the “TEST” and “RESET” buttons. Those are GFCI (Ground Fault Circuit Interrupter) outlets. They are life-savers that shut off power instantly if they detect an imbalance, preventing electric shock in wet areas.
Wiring a GFCI is similar, but it has two sets of terminals:
- LINE: This is where the wires coming from the breaker box connect.
- LOAD: This is used to protect other outlets downstream on the same circuit.
For a single GFCI replacement, you will only use the LINE terminals. Just connect the black, white, and ground wires as you did before, making sure they go to the screws labeled “LINE”.
Troubleshooting: What If It Doesn’t Work?
Problem: The outlet has no power.
- Solution: Did you remember to turn the breaker back on? If so, turn it off again and double-check all your wire connections to make sure they are tight.
Problem: The breaker trips as soon as you turn it on.
- Solution: This usually means the hot wire is touching the ground wire or the side of a metal electrical box somewhere. Turn the power off, pull the outlet back out, and inspect your wiring carefully to make sure no wires are touching.
Conclusion
You did it! By following these steps, you’ve not only added function to your home but also gained a valuable new skill. Taking control of small projects like this builds confidence and saves money. Remember to always prioritize safety, take your time, and never be afraid to call a professional if you feel out of your depth.
If you enjoyed this guide, explore more easy-to-follow projects and “how-to” queries at howtoresults!
FAQs
Which wire goes where on an outlet?
It’s a simple color code: The black (hot) wire goes to the brass/gold screw, the white (neutral) wire goes to the silver screw, and the bare copper or green (ground) wire goes to the green screw.
What happens if you wire an outlet backward?
If you reverse the hot and neutral wires, the outlet may still power devices, but it creates a dangerous situation. The “off” switch on an appliance may not fully cut power, leaving parts of it energized and increasing the risk of electric shock.
Do I need a special tool to wire an outlet?
While you don’t need highly specialized tools, a voltage tester is non-negotiable for safety. Wire strippers and a good set of screwdrivers are also essential for doing the job correctly and easily.
What color is the hot wire?
The hot wire, which carries the electrical current from the breaker, is almost always black. In some cases (like in a 3-way switch), it can also be red.
Can I wire an outlet myself?
In most places, homeowners are permitted to perform minor electrical work like replacing an outlet in their own home. However, it’s crucial to follow safety procedures and check local building codes. If you’re not 100% confident, hire a licensed electrician.
How do you wire a GFCI outlet?
You connect the incoming power wires (from the breaker panel) to the terminals marked “LINE” on the back of the GFCI outlet. The black wire goes to the brass “LINE” screw, and the white wire goes to the silver “LINE” screw.
What is the difference between 15 amp and 20 amp outlets?
A 15-amp outlet has two vertical slots. A 20-amp outlet has the standard vertical slots plus a horizontal T-shape on the neutral side. You must match the outlet to the amperage of the circuit breaker protecting it (e.g., a 20-amp breaker needs 20-amp outlets and thicker 12-gauge wire).
Does the ground wire have to be connected?
Absolutely. The ground wire is a critical safety feature that protects against electric shock in the event of a fault. Never install an outlet without properly connecting the ground wire.
What size wire for a 20 amp outlet?
A 20-amp circuit requires a thicker wire to handle the higher current. You must use 12-gauge wire for a 20-amp circuit. A 15-amp circuit uses 14-gauge wire.
How can I tell if an outlet is wired correctly?
The best way is to use an inexpensive outlet tester (or receptacle tester). You plug it into the outlet, and a series of lights will tell you if it’s wired correctly, if the ground is missing, or if the hot and neutral wires are reversed.